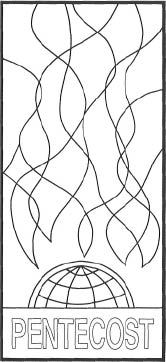
The dramatic description of the wind and tongues of fire found in Acts 2 was the inspiration for this Pentecost banner, designed by Norman Mathias for Covenant Christian Reformed Church of Sioux Center, Iowa. The banner was submitted by Joanne Alberda.
Although the design is fairly complex, it does allow for some alternative materials and assembly methods. One thought I had was to use strips of overlapping red and orange nylon netting instead of the precisely cut flame shapes. If you are short of time, you could also leave off the word "Pentecost." Lettering, believed by some to be a requirement on all banners, often takes the most time to cut out and attach. Why not let the visual speak for itself? With so much of our worship based on words, a well-designed, wordless banner is a welcome addition—especially for children too young to read.
I particularly like the way the makers of this banner handled the smaller pieces. Joanne writes, "We made a full-sized drawing of the banner, (44"x99") using an overhead projector, then traced the individual pieces of the pattern. We then trimmed these individual pattern pieces down (1/4" off all sides) to allow the background to form a striking web of lines rising vertically amid the flames."
Use whatever fabric and colors you might be able to find. The Covenant Church banner used navy corduroy for background fabric. "All remaining pieces," says Joanne, "are of felt. The lettering is deep red on a white field. The globe is light blue. A white band surrounds the light blue globe, and above that is a royal blue area from which the flames arise. The colors of the flames begin with deep red at the bottom, change to red and yellow oranges, and become a brilliant yellow at the top." The flames alone would make a beautiful banner!
Details
- Fabric: 3 yards of navy corduroy, 44-45 inches wide. Felt in the following colors: white, dark blue, light blue, red, red orange, orange, yellow orange, yellow}
- Fusible Interfacing (iron-on fabric adhesive)
- Lining (optional)
- Rods (top and bottom) on which to hang the banner
Step by Step
- Make a full-sized drawing of the banner. (Paper from a roll used in meat markets is handy.) Keep this pattern in one piece to use as a background for the placement of individual pieces.
- From the large pattern, trace the individual pieces of the pattern. Number them for easy placement.
- Decide how much fabric you will need for each part of the banner. Purchase an extra 12 inches of the background piece to allow for finishing.
- Wash and dry the corduroy. Do not cut the edges, but fold back the sides to make a width of 44 inches. Square off the top and bottom edges and fold to the back to make a sleeve for the rods for hanging. Do not stitch this down until the felt has been fused to the backing.
- Cut the pattern pieces. Trim about a fourth of an inch from all sides so that a half inch of background fabric will show, creating lines between the pieces.
- Place the felt on top of the fusible fabric. Lay pattern pieces on top. Pin through the three layers. Then cut the pieces.
- With an iron, fuse all pieces to the background fabric.
- Stitching around all pieces after they are fused is optional. It does lengthen the life of the banner. The back can be lined as well for a more tailored look.
- Fold back the excess length and hand stitch in place to form a sleeve for the rods. A rod at both the top and bottom will improve the appearance of the banner.